
Behind the scenes of our first delivery


We previously discussed the first call with our first client in our article A deep dive into the first call. Following that, once the client's specifications were clearly defined, it was time to dive into the code to produce what was requested: a website to showcase and sell services.
What's interesting isn't what we did (since it's a classic website), but how we did it, so let me (Nicolas), describe the process.
What is a full stack application?
The first step is understanding how a full stack application works. A full stack application consists of a backend and a frontend. The backend handles the database, data processing, and complex logic. The frontend is the interface that the client uses to interact with the application (the website).
From a technical stack perspective, we use the Django framework to write our backend. This allows us to quickly set it up with a powerful ORM. Python is known for its ease in handling complex data. Both Django and Python benefit from an extremely solid ecosystem.
For the frontend, we use NextJS from Vercel with TypeScript. The advanced ecosystem of React allows us to benefit from pre-designed components, such as those from Shadcn UI. Thanks to this, we can easily create beautiful sites even though design isn't our strong suit.
Here is the flow chart of a full stack application:
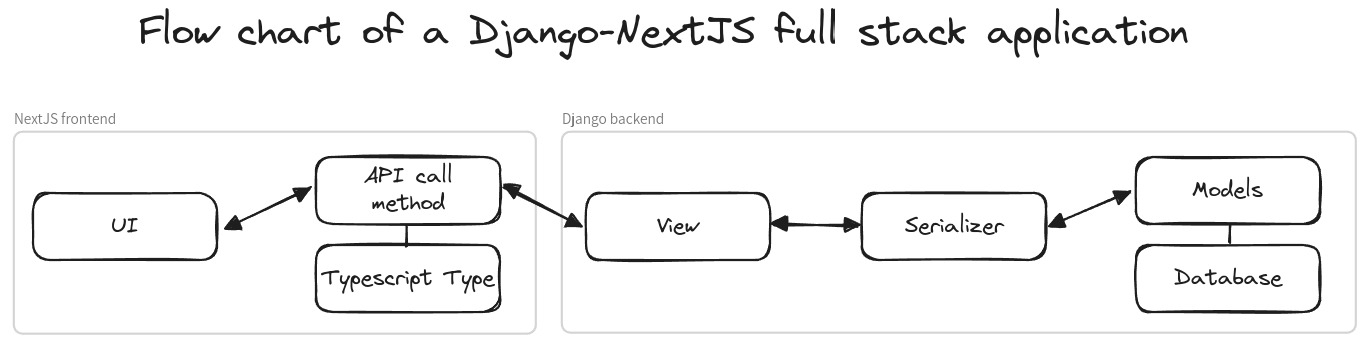
Even though a picture is worth a thousand words, let's take the time to understand this graph. When the user interacts with the UI, they make an API call to the backend on a specific URL. This happens, for example, when they want to retrieve the list of available products. This URL is available thanks to the View. In our example, the view directly retrieves the data from the database using the Model, then formats this data with a serializer before returning it to the frontend. Once the frontend obtains this data, it can display it to the user who triggered the event.
For each new feature we want to add, it is often necessary to build all these blocks. With my few years of experience, I noticed the redundancy of this process and proposed something a bit crazy to Tom: to automate this flow as much as possible. This is how Nango was born.
Basically, the goal is to only have to create a model for the database and then be able to use this model directly in the frontend without even writing a single method to call the backend. Of course, some views or serializers have specific behaviours that will require adjustments from the developer. But Nango aims to automate the common base for views and serializers.
Some might wonder: How is it possible to automate such a flow?
Automating the developer's flow
As I mentioned earlier, the Django model is the object that interacts with the database. It is composed of fields that correspond to the different columns present in the database table. This cannot be automated (without reading the developer's mind). But it is the starting point and the central hub of our automation.
From the model, we can build the serializer. This allows us to validate input data to populate the database or format data coming from the database. We generate the serializer file (using Jinja) that contains the model and its fields.
Next, we generate the view file. Views are very similar because they are often composed of the methods list, retrieve, create, update, delete for the corresponding endpoints. Of course, behaviours can change from one view to another, but the base remains the same. And so, we can automate this base.
The three parts we just discussed are the only parts of this automation that require developer intervention for customization, as they involve specific behaviours for each element. The next three parts are entirely dynamic, and here's why:
The next step, which we haven't really discussed yet, is routing. When the frontend method calls the backend API to retrieve data, it makes the call on a URL. However, this URL must be assigned to a view. For example, if we want the URL https://my-domain.com/product/ to call the corresponding product view, we need to make the association between this view and the product/ route. For this, we are inspired by NextJS's dynamic routing, which is based on the file architecture to define routes. We will look at the existing views to dynamically assign routes with the same name.
From the serializer, we know the fields that will be returned by the endpoint. We can therefore easily and dynamically build the TypeScript type that will be used on the frontend by the API method call.
For each method of the view, we can produce an API call method. Each API call method is identical, with slight variations (such as the route, the type of call, the type of object, and the input data).
Conclusion
Unfortunately, Nango is not yet able to do all of this. But it is well on its way to achieving it in a few months. For now, it can handle the generation of serializers and views from Django models. Even incomplete, using it brings us a significant gain: time. This allowed us to quickly develop the website for our first client while meeting their expectations.
That's it! We hope you enjoyed this behind-the-scenes look at our first delivery!
Feel free to give us some feedback, and share it with your friends!


